创建您的网站
¥Creating your site
安装Material for MkDocs 后,您可以使用mkdocs可执行文件引导项目文档。转到您希望项目所在的目录并输入:
¥After you've installed Material for MkDocs, you can bootstrap your project documentation using the mkdocs executable. Go to the directory where you want your project to be located and enter:
或者,如果您在 Docker 中运行 Material for MkDocs,请使用:
¥Alternatively, if you're running Material for MkDocs from within Docker, use:
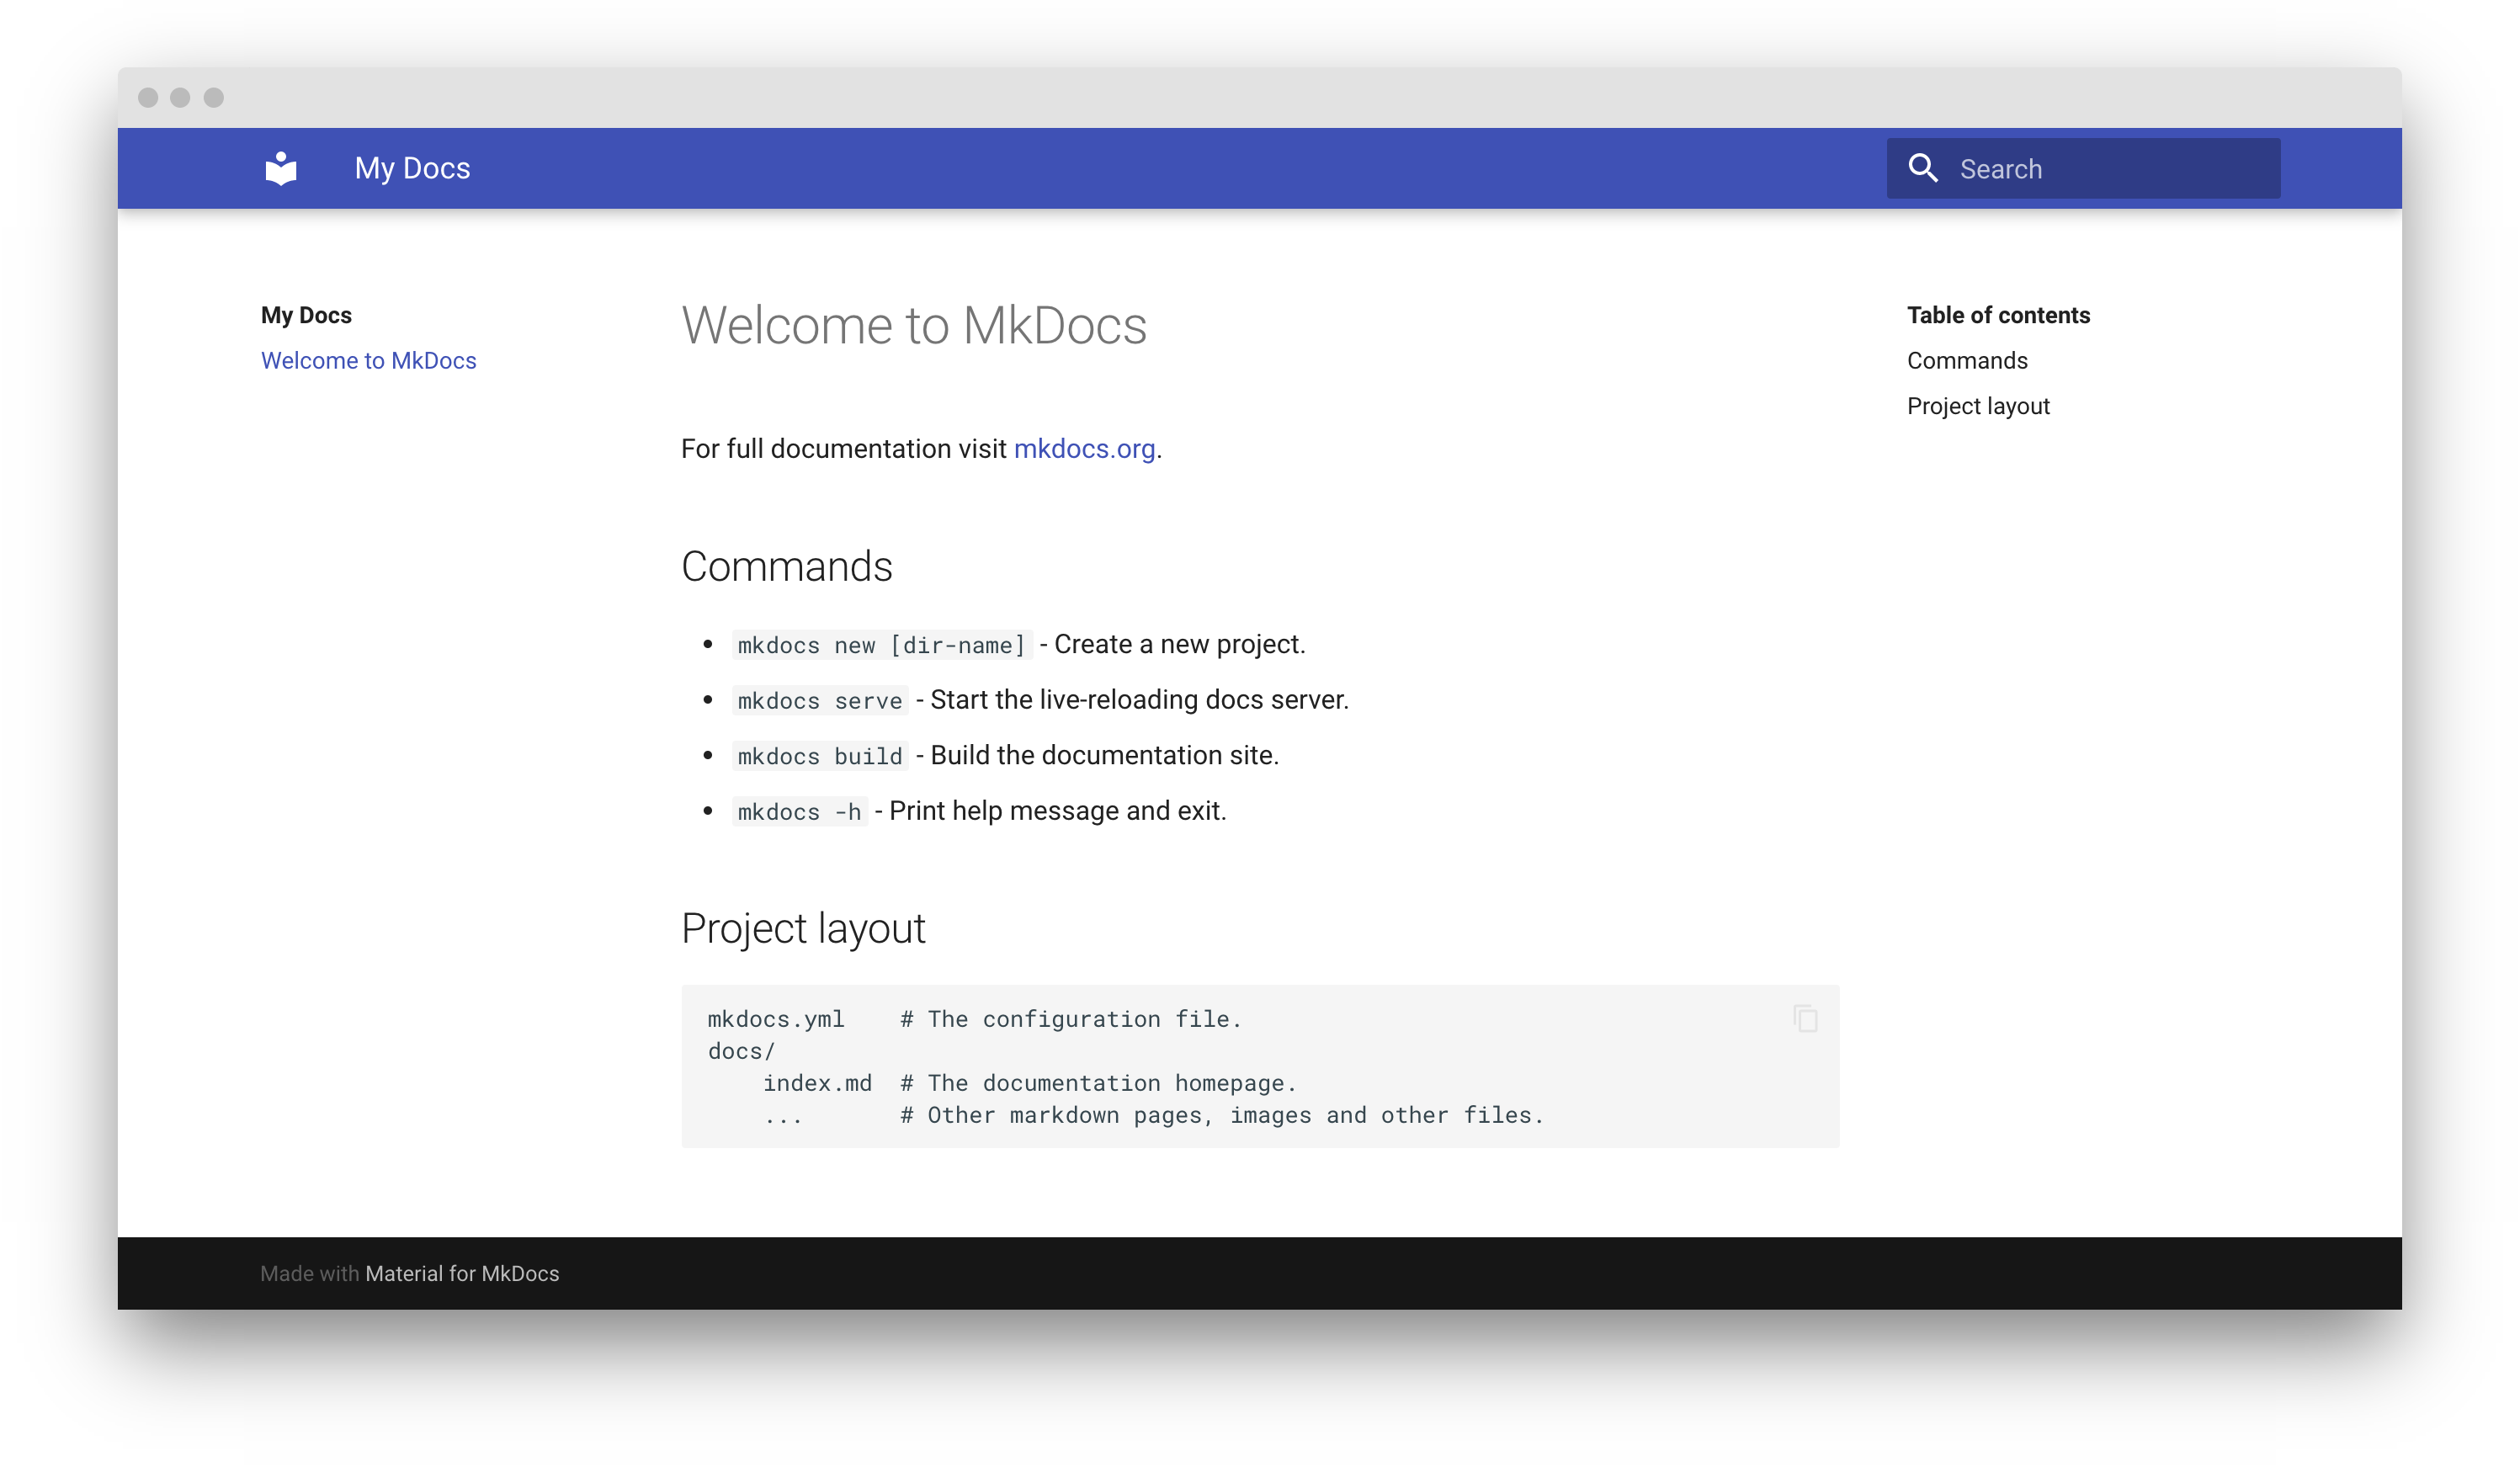
这将创建以下结构:
¥This will create the following structure:
配置
¥Configuration
最低配置
¥Minimal configuration
只需设置site_name并将以下行添加到mkdocs.yml即可启用主题:
¥Simply set the site_name and add the following lines to mkdocs.yml to enable the theme:
site_url设置非常重要,原因有很多。默认情况下,MkDocs 会假定你的网站托管在你的域名根目录下。但实际情况并非如此,例如,当你发布到 GitHub 页面时——除非你使用自定义域名。另一个原因是,有些插件需要设置site_url ,所以你应该始终这样做。
¥The site_url setting is important for a number of reasons. By default, MkDocs will assume that your site is hosted at the root of your domain. This is not the case, for example, when publishing to GitHub pages - unless you use a custom domain. Another reason is that some of the plugins require the site_url to be set, so you should always do this.
Recommended: configuration validation and auto-complete
为了最大限度地减少摩擦并最大限度地提高生产力,Material for MkDocs 为mkdocs.yml提供了自己的schema.json 1。如果您的编辑器支持 YAML 模式验证,则强烈建议您进行设置:
¥In order to minimize friction and maximize productivity, Material for MkDocs provides its own schema.json1 for mkdocs.yml. If your editor supports YAML schema validation, it's definitely recommended to set it up:
安装vscode-yaml以获得 YAML 语言支持。
¥Install
vscode-yamlfor YAML language support.在您的用户或工作区settings.json中的
yaml.schemas键下添加架构:{ "yaml.schemas": { "https://squidfunk.github.io/mkdocs-material/schema.json": "mkdocs.yml" }, "yaml.customTags": [ // (1)! "!ENV scalar", "!ENV sequence", "!relative scalar", "tag:yaml.org,2002:python/name:material.extensions.emoji.to_svg", "tag:yaml.org,2002:python/name:material.extensions.emoji.twemoji", "tag:yaml.org,2002:python/name:pymdownx.superfences.fence_code_format", "tag:yaml.org,2002:python/object/apply:pymdownx.slugs.slugify mapping" ] }{ "yaml.schemas": { "https://squidfunk.github.io/mkdocs-material/schema.json": "mkdocs.yml" }, "yaml.customTags": [ // (1)! "!ENV scalar", "!ENV sequence", "!relative scalar", "tag:yaml.org,2002:python/name:material.extensions.emoji.to_svg", "tag:yaml.org,2002:python/name:material.extensions.emoji.twemoji", "tag:yaml.org,2002:python/name:pymdownx.superfences.fence_code_format", "tag:yaml.org,2002:python/object/apply:pymdownx.slugs.slugify mapping" ] }{ "yaml.schemas": { "https://squidfunk.github.io/mkdocs-material/schema.json": "mkdocs.yml" }, "yaml.customTags": [ // (1)! "!ENV scalar", "!ENV sequence", "!relative scalar", "tag:yaml.org,2002:python/name:material.extensions.emoji.to_svg", "tag:yaml.org,2002:python/name:material.extensions.emoji.twemoji", "tag:yaml.org,2002:python/name:pymdownx.superfences.fence_code_format", "tag:yaml.org,2002:python/object/apply:pymdownx.slugs.slugify mapping" ] }{ “yaml.schemas”:{ “https://squidfunk.github.io/mkdocs-material/schema.json”:“mkdocs.yml” }, “yaml.customTags”:[//(1)!如果您计划使用图标和表情符号,则此设置是必需的,否则Visual Studio Code 会在某些行显示错误。
确保您选择的编辑器支持 YAML 模式验证。
¥This setting is necessary if you plan to use
在
mkdocs.yml的顶部添加以下几行:¥Ensure your editor of choice has support for YAML schema validation.
# yaml-language-server: $schema=https://squidfunk.github.io/mkdocs-material/schema.json# yaml-language-server: $schema=https://squidfunk.github.io/mkdocs-material/schema.json# yaml-language-server: $schema=https://squidfunk.github.io/mkdocs-material/schema.json# yaml 语言服务器:$schema=https://squidfunk.github.io/mkdocs-material/schema.json
高级配置
¥Advanced configuration
Material for MkDocs 附带许多配置选项。设置部分详细解释了如何配置和自定义颜色、字体、图标等:
¥Add the schema under the yaml.schemas key in your user or workspace settings.json:
此外,请参阅与 Material for MkDocs 原生集成的受支持Markdown 扩展列表,提供前所未有的轻松技术写作体验。
¥Add the following lines at the top of mkdocs.yml:
模板
¥Templates
如果您想快速启动一个新项目,您可以使用我们不断增长的模板集合之一:
¥Material for MkDocs comes with many configuration options. The setup section explains in great detail how to configure and customize colors, fonts, icons and much more:
博客创建博客
社交卡使用社交卡创建文档
边写边预览
¥Previewing as you write
MkDocs 包含一个实时预览服务器,因此您可以在编写文档时预览更改。保存后,服务器将自动重建站点。使用以下命令启动它:
¥Furthermore, see the list of supported Markdown extensions that are natively integrated with Material for MkDocs, delivering an unprecedented low-effort technical writing experience.
如果您有一个大型文档项目,MkDocs 可能需要几分钟才能重建所有页面供您预览。如果您只对当前页面感兴趣,则--dirtyreload标志将使重建速度更快:
mkdocs serve --dirtyreloadmkdocs serve --dirtyreloadmkdocs serve --dirtyreloadmkdocs serve --dirtyreload
如果您在 Docker 中运行 Material for MkDocs,请使用:
¥If you want to jump start a new project, you can use one of our growing collection of templates:
将浏览器指向localhost:8000你应该会看到:
¥ Blog
建立您的网站
¥Building your site
完成编辑后,您可以使用以下方式从 Markdown 文件构建静态站点:
如果您在 Docker 中运行 Material for MkDocs,请使用:
¥Create documentation with social cards
此目录的内容构成了您的项目文档。无需操作数据库或服务器,因为它完全独立。该网站可以托管在GitHub Pages 、 GitLab Pages 、您选择的 CDN 或您的私人网络空间上。
¥MkDocs includes a live preview server, so you can preview your changes as you write your documentation. The server will automatically rebuild the site upon saving. Start it with:
如果您打算将您的文档作为一组文件分发,以便从本地文件系统而不是 Web 服务器读取(例如.zip文件),请阅读有关构建离线使用的说明。
¥If you have a large documentation project, it might take minutes until MkDocs has rebuilt all pages for you to preview. If you're only interested in the current page, the --dirtyreload flag will make rebuilds much faster: